Go back

CircleCI Breach: Detect and Mitigate to Assure Readiness

Circle CI Breach

Contents

On January 4, 2023, CircleCI, a continuous integration (CI/CD) and delivery service, reported a data breach. The company urged its customers to take immediate action while a complete investigation is ongoing. First critical actions recommended by CircleCI were to ‘rotate any and all secrets stored in CircleCI’ and ‘review related activities for any unauthorized access starting from December 21, 2022 to January 4, 2023’.

Why is it such a big deal

Malicious use of access keys in conjunction with privileged access can have a significant impact on an organization’s source code, deployment targets, and sensitive data across its infrastructure. 

CI/CD pipelines operation requires exactly that – high-privileged access which in most cases is administrative and direct access to source code repositories essential for smooth operation – and as such, considered a critical component of the software development life cycle (SDLC). 

Start investigating for malicious activity in your cloud environment

Data breaches are unfortunately common and should no longer be a surprise. Every third-party service or application has the potential to act as a supply chain vector by an attacker. When that occurs, excessive access that was previously benign can become a critical exposure, allowing the threat actor to exploit the system freely.

Here are immediate next steps security and DevOps teams should take to eliminate any possible supply chain
risk – those recommended by CircleCI and beyond:

  1. Discover possible entry points – Critical first step involves mapping, linking and reviewing the access of all secrets given to the compromised third-party service to fully understand all initial access attempts and possible lateral movement across all supply chain vectors.

    Specific to CircleCI data breach, Rezonate observed that multiple accounts had a few AWS programmatic access keys with administrative privileges in the CircleCI configuration, allowing for creation and modification of any resource within the account.
  1. Threat containment (& traps) – Once you identify any and all keys, the first option is to deactivate or delete them and create new ones (avoid rotating an unused key). However, while you prevent any future use of these keys, you also limit any potential traces of benign or malicious activity. Why? In the case of AWS, Cloudtrail has limited authentication logging for invalid or disabled keys.

    A second more preferred option is to remove all privileges from users while keeping the keys and users active. This enables further monitoring of activity using ‘canary keys,’ where every access attempt triggers an alert and extracts threat intelligence artifacts (IOCs such as IP address).
  1. Activity review & behavioral profiling – Once you capture all suspected keys, you can begin analyzing their activity within the defined range reported. In our case, we used AWS Cloudtrail as the main data source and investigated the access behavioral patterns. The goal is to create a ‘clean’ baseline of activities that occurred prior to the breach. To help define a profile, understand the scope, and identify any potential areas of concern, consider asking the following questions:
    • Reduce the overwhelming number of insignificant incident alerts and the time spent addressing them
    • Increase operational visibility into cloud identity and access security across platforms
    • Discover and monitor third party cross-cloud access
    • Limit permissions and restrict access to the minimum users required without any impact to operations.

Once we have a good understanding of normal operation, we can apply the same approach to inspect activities from the date of breach until the present. In this case, the context of workflows, resources, and overall architecture is paramount, so it is critical to collaborate with the dev/infra team to quickly assess, validate, and prioritize findings.

  1. Activity review & threat models – Based on the results of previous steps, further questions may indicate a potentially malicious exploitation, such as attempts to elevate privileges, gain persistence, or exfiltrate data. To help pinpoint the most relevant findings, consider the following options:
Activities performed outside of our regular regionsAlerting for anomaly of regular access in an attempt to locate compromised resources
Identity-creation activities
(ATT&CK TA0003)
Activities such as CreateUser and CreateAccessKey attempting to gain persistency
Resource-creation activitiesDiscover attempts to perform resource exhaustion for crypto mining and others
Activities performed outside of the regular CircleCI IP rangesIdentify any access attempts from external IPs that may relate to known bad intel
Errors occurredDetect “pushing the limits” attempts to exploit user privileges resulting in error (e.g. AccessDenied)
Spike in enumeration activities
(ATT&CK T1580)
Detect increased recon and mapping actions (e.g. user and role listing)
Defense evasion techniques
(ATT&CK TA0005)
Detect tampering attempts to limit defense controls (e.,g. DeleteTrail or modify GuardDuty settings)
Secret access attemptsDetect bruteforce actions against mapped secrets to elevate account foothold

It’s important to consider all suggested actions as part of the overall context, as some may be legitimate while others may be malicious. By correlating them all together, you can reduce noise and false positives. 

How Rezonate can help

It’s important to note that while this guidance specifically addresses key actions related to the CircleCI data breach, it can also serve as best practice for addressing any risks for any breach.

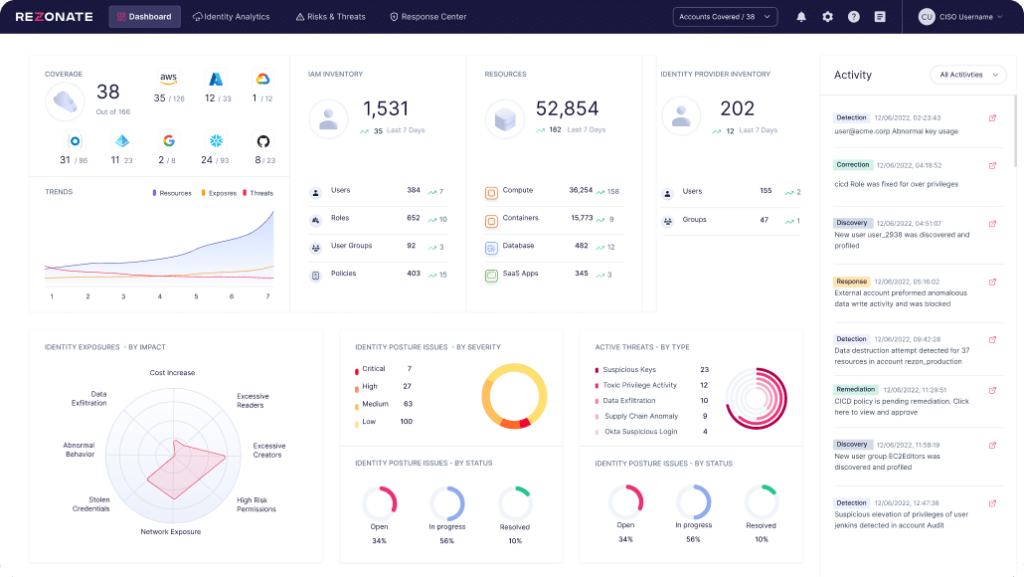
Rezonate automates the actions described above to streamline the compromise assessment process and reduce the time and effort required for manual analysis. Rezonate simplifies discovery, detection, and investigation of the compromise.

Work with a system that can automatically correlate and summarize all activities of all identities to save critical time. Working directly with CloudTrail can be challenging, lacking aggregation, data-correlation  and privileged tagging eventually slowing you down. 

We have been collaborating with our clients and partners to utilize the Rezonate platform to thoroughly investigate the security incident and assess its potential impact on all activities mentioned here. If you require assistance, please do not hesitate to contact us. Providing support to our clients and the community is a key purpose of Rezonate’s founding.

Continue Reading

More Articles
Threat Hunting for Identity Threats in Snowflake

Frosty Trails: Threat-Hunting for Identity Threats in Snowflake

The Snowflake platform has revolutionized how organizations store, process, and analyze large volumes of data. It offers a fully-managed data warehouse-as-a-service solution, providing a scalable and flexible architecture allowing seamless data integration from multiple sources. As Snowflake rises in popularity as one of the top ten cloud vendors in the world, its attractiveness to organizations also draws the attention of malicious attackers. The platform's widespread adoption and extensive use in storing valuable data make it a lucrative target for cyber threats. As a result, you must implement security measures, stay vigilant against emerging threats, and continuously update your defense mechanisms to safeguard Snowflake data sharing and infrastructure from potential attackers.This post will help you grasp how to use Snowflake's built-in logging features for your security operation routine. We will explore the relevant data Snowflake exposes for hunting and describe ten threat scenarios and how to detect them. We will also share a script to execute them and perform quick threat-hunting operations in your environment to stay secure and audit-ready. What is Snowflake? Snowflake is a cloud-based data platform that provides a fully managed and scalable solution for storing, processing, and analyzing large volumes of data. It is designed to work on top of popular cloud providers like Amazon Web Services (AWS), Microsoft Azure, and Google Cloud Platform (GCP). Snowflake is built with a unique architecture that separates storage and computing, allowing identities to scale resources independently based on their needs.  This architecture, combined with its ability to process semi-structured and structured data, enables Snowflake to deliver high performance and cost-efficiency for data workloads of any size. As we'll see in the next section, a Snowflake account can hold multiple databases without taking care of the infrastructure. Key Snowflake Logging Features Each Snowflake account has a default database called “SNOWFLAKE”. It is a shared read-only database that holds metadata and historical usage data related to the objects within your organization and accounts.   The SNOWFLAKE database has a built-in schema called "ACCOUNT_USAGE", which is a system-defined schema containing a set of views providing access to comprehensive and granular usage information for the Snowflake account. It is a valuable tool for monitoring and understanding how resources are utilized within your Snowflake environment.  The schema includes views that cover  user activity  query history  warehouse usage  login history  data transfer details, and more.   There are more logging mechanisms in Snowflake, such as INFORMATION_SCHEMA and READER_ACCOUNT_USAGE. During this post, we will rely on the following ACCOUNT_USAGE views: Exploring ACCOUNT_USAGE By default, each Snowflake account has a database called SNOWFLAKE that is accessible to the ACCOUNTADMIN role. You can grant additional roles and have access through the following command: GRANT imported privileges on database snowflake to role rezonate_integration; You can explore the available views by logging in as an ACCOUNTADMIN to your Snowflake account and performing the following steps: From the left pane, choose Data and then Databases. Select the SNOWFLAKE database and expand it. 3. Expand ACCOUNT_USAGE and select any of the views within it. Each available view in the schema has its own column structure. You can see the available columns for each view by clicking on the view name, choosing the Columns tab, and selecting “Explore available columns”. Comprehensive documentation per view is available, including the retention period and logging latency. Snowflake Data Governance - How to Access Snowflake Audit Logs The Snowflake logs are accessible through a few methods, as you’ll see below. 1. Snowflake Console  The most straightforward method of accessing the logs is logging in to a Snowflake account with a user that has read permissions to the  ACCOUNT_USAGE schema. Then, choose "Worksheets" from the left pane and ensure the worksheet is querying the correct data source. You should see something like the query browser below. 2. SnowSQL SnowSQL is a command-line tool provided by Snowflake designed to interact with Snowflake's data warehouse and execute SQL queries, manage data, and perform various administrative tasks. It acts as the official command-line client for Snowflake, allowing users to connect to their Snowflake accounts and work with data using SQL commands. Information about installing, configuring, and using it is available in Snowflake’s documentation. 3. Exporting to external storage Snowflake facilitates data export to contemporary storage services like AWS S3 through  "Stage" functionality. The data exported from Snowflake can be saved in various file formats. You can find detailed information about Stages on Snowflake's official documentation page.  Once the Stage setup is complete and data is exported, you have the flexibility to utilize your preferred analysis tool to centralize the data in a location of your choice. 4. Snowflake SDKs As well as the structured methods mentioned earlier, Snowflake supports native REST API accessible through different SDKs. It can be used by any script or tool for purposes like exporting data. An example is the Rezonate Threat-Hunting Tool, which takes advantage of Snowflake Python SDK to execute threat-hunting queries. We’ll find out more later in the blog.  Besides the Python SDK, the Snowflake team has developed drivers for many popular languages, including .NET, NodeJS, and Go. The full list is available here. 10 Snowflake Threat-Hunting Techniques to Implement Now  Now we’ve learned about Snowflake’s structure, basic permissions, and integrations, we can start threat-hunting. In this section, we will guide you through some critical threat-hunting scenarios to look out for and explain each. We will also mark the relevant Snowflake views, align them to the specific MITRE ATT&CK technique, and include our own query in Snowflake query syntax. Remember, you can copy and paste them directly to your worksheet. It is important to highlight that some hunting queries may have false positives, depending on the environment and may need adjustments to reduce noisy results. Scenario 1 - Brute Force on a Snowflake User A brute force attack on a Snowflake user happens when an attacker uses trial-and-error to repeatedly submit different combinations of usernames and passwords and eventually gain unauthorized access. To hunt for this type of attack, you can search for an attacker that performed more than X failed login attempts on at least Y target users, failing or ending up with a successful login. In failure cases, the activity may result in a user's lockout. Relevant Snowflake View SNOWFLAKE.ACCOUNT_USAGE.LOGIN_HISTORY Query -- Get users who failed to login from the same IP address at least 5 times select CLIENT_IP, USER_NAME, REPORTED_CLIENT_TYPE, count(*) as FAILED_ATTEMPTS, min(EVENT_TIMESTAMP) as FIRST_EVENT, max(EVENT_TIMESTAMP) as LAST_EVENT from SNOWFLAKE.ACCOUNT_USAGE.LOGIN_HISTORY where IS_SUCCESS = 'NO' and ERROR_MESSAGE in ('INCORRECT_USERNAME_PASSWORD', 'USER_LOCKED_TEMP') and FIRST_AUTHENTICATION_FACTOR='PASSWORD' and       EVENT_TIMESTAMP >= DATEADD(HOUR, -24, CURRENT_TIMESTAMP()); group by 1,2,3 having FAILED_ATTEMPTS >= 5 order by 4 desc; -- For Each result, check if the source IP address managed to login to the target user AFTER the "lastEvent" time MITRE Technique Credential Access | Brute Force | ATT&CK T1110  Scenario 2 - Password Spray on a Snowflake Account A brute force attack on a Snowflake account involves an attacker repeatedly submitting different combinations of usernames and passwords to eventually manage to log in and gain unauthorized access. To hunt for any occurrence of this scenario, you can search for an attacker that performed more than 1 failed login attempt on at least Y unique target users, from the same IP address. Relevant Snowflake View SNOWFLAKE.ACCOUNT_USAGE.LOGIN_HISTORY Query -- Get users who failed to login from the same IP address at least 5 times select CLIENT_IP, REPORTED_CLIENT_TYPE, count(distinct USER_NAME) as UNIQUE_USER_COUNT, min(EVENT_TIMESTAMP) as FIRST_EVENT, max(EVENT_TIMESTAMP) as LAST_EVENT from SNOWFLAKE.ACCOUNT_USAGE.LOGIN_HISTORY where IS_SUCCESS = 'NO' and ERROR_MESSAGE in ('INCORRECT_USERNAME_PASSWORD', 'USER_LOCKED_TEMP') and FIRST_AUTHENTICATION_FACTOR='PASSWORD' and       EVENT_TIMESTAMP >= DATEADD(HOUR, -24, CURRENT_TIMESTAMP()); group by 1,2 having UNIQUE_USER_COUNT >= 1 order by 3 desc; -- For Each result, check if the source IP address managed to login to the target user AFTER the "lastEvent" time MITRE Technique Credential Access | Brute Force | ATT&CK T1110 Scenario 3 - Unauthorized Login Attempt to a Disabled/Inactive User  In some cases, Snowflake user accounts might have been disabled due to security concerns or maybe even as part of employee off-boarding. Monitoring login attempts to disabled users can help you detect unauthorized activities. Relevant Snowflake View SNOWFLAKE.ACCOUNT_USAGE.LOGIN_HISTORY Query -- Search for login attempts to disabled users select * from SNOWFLAKE.ACCOUNT_USAGE.LOGIN_HISTORY where IS_SUCCESS = 'NO' and  ERROR_MESSAGE  = 'USER_ACCESS_DISABLED' MITRE Technique Credential Access | Brute Force | ATT&CK T1110  Scenario 4 - Login Attempt Blocked by Network Policy Snowflake network policies are a set of rules that govern network communication and access control within the Snowflake data platform. A network policy can deny a connection based on the client’s characteristics, such as IP address, to enforce organization policy and reduce the chances of a compromised account in case of leaked credentials.By searching for these failed logins we can identify violations of the organizational policies that may suggest compromised credentials. Relevant Snowflake View SNOWFLAKE.ACCOUNT_USAGE.LOGIN_HISTORY Query -- Search for network policies blocked IP addresses select * from SNOWFLAKE.ACCOUNT_USAGE.LOGIN_HISTORY where IS_SUCCESS = 'NO' and  ERROR_MESSAGE  = 'INCOMING_IP_BLOCKED' and EVENT_TIMESTAMP >= DATEADD(HOUR, -24, CURRENT_TIMESTAMP()); Scenario 5 - Exfiltration Through Snowflake Data Sharing Snowflake administrators can share data stored in their accounts with other Snowflake accounts. An attacker might use shares to exfiltrate data from Snowflake resources stored on compromised accounts to external locations. Any unauthorized event of this nature is a big red flag. Relevant Snowflake View SNOWFLAKE.ACCOUNT_USAGE.QUERY_HISTORY Query -- Search for new data shares select *  from SNOWFLAKE.ACCOUNT_USAGE.QUERY_HISTORY  where REGEXP_LIKE(QUERY_TEXT, 'create\\s+share\\s.*','i') or REGEXP_LIKE(QUERY_TEXT, '\\s+to\\s+share\\s.*','i') and START_TIME>= DATEADD(HOUR, -24, CURRENT_TIMESTAMP()); MITRE Technique Exfiltration | Transfer Data to Cloud Account| ATT&CK T1537  Scenario 6 - Exfiltration Through Snowflake Stage A Snowflake stage is an external storage location that serves as an intermediary for loading or unloading data into or from Snowflake, providing seamless integration with various cloud-based storage services. For example, an AWS S3 bucket can serve as a stage. You can use the following queries to search potential data exfiltration using this feature.  Relevant Snowflake View SNOWFLAKE.ACCOUNT_USAGE.QUERY_HISTORY SNOWFLAKE.ACCOUNT_USAGE.STAGES Query -- Search for stage-related statements select * from SNOWFLAKE.ACCOUNT_USAGE.QUERY_HISTORY where QUERY_TEXT ilike '%COPY INTO%' and QUERY_TEXT ilike '%@%'; -- The following query will show the stages that were created in the last 24 hours select * from SNOWFLAKE.ACCOUNT_USAGE.STAGES where CREATED>= DATEADD(HOUR, -24, CURRENT_TIMESTAMP()); MITRE Technique Exfiltration | Transfer Data to Cloud Account| ATT&CK T1537  Scenario 7 - Persistency Through Snowflake Procedures & Tasks Procedures and tasks are Snowflake features that automate and manage workflows. Snowflake Procedures: Procedures in Snowflake are user-defined scripts written in SQL or JavaScript that allow you to encapsulate a series of SQL or JavaScript statements as a reusable unit. Snowflake Tasks: Tasks are scheduled operations that automate repetitive tasks or workflows. They are defined using SQL or JavaScript and can include SQL queries, DML statements, or calls to procedures. Tasks are scheduled to run at specific intervals, such as hourly, daily, or weekly, making them ideal for automating data pipelines and regular data processing. An attacker might utilize procedures and tasks to maintain persistently in the organization or exfiltrate data over time. Relevant Snowflake View SNOWFLAKE.ACCOUNT_USAGE.QUERY_HISTORY Query -- Search for new tasks select * from SNOWFLAKE.ACCOUNT_USAGE.QUERY_HISTORY  where REGEXP_LIKE(QUERY_TEXT, '.*CREATE\\s+(OR\\s+REPLACE\\s+)?TASK.*', 'i') and START_TIME >= DATEADD(HOUR, -24, CURRENT_TIMESTAMP()); -- Search for new procedures select * from SNOWFLAKE.ACCOUNT_USAGE.QUERY_HISTORY  where REGEXP_LIKE(QUERY_TEXT, '.*CREATE\\s+(OR\\s+REPLACE\\s+)?PROCEDURE.*', 'i') and START_TIME >= DATEADD(HOUR, -24, CURRENT_TIMESTAMP()); MITRE Technique Execution | Scheduled Task/Job | ATT&CK T1053  Execution  | Automated Exfiltration | ATT&CK T1020  Scenario 8 - Defense Evasion Through Unset Masking Policy A Snowflake masking policy is a security mechanism that protects sensitive data within a database. It allows you to define rules for obscuring or redacting specific data elements, such as Social Security Numbers (SSNs) or credit card numbers, to limit their visibility to unauthorized users. Attackers might bypass masking policies by unsetting them, given the right permission, and then exfiltrating sensitive information. Relevant Snowflake View SNOWFLAKE.ACCOUNT_USAGE.QUERY_HISTORY Query -- Search for unsetting of a masking policy select * from SNOWFLAKE.ACCOUNT_USAGE.QUERY_HISTORY where QUERY_TEXT ilike '%UNSET MASKING POLICY%' and START_TIME >= DATEADD(HOUR, -24, CURRENT_TIMESTAMP()); MITRE Technique Data Manipulation| Stored Data Manipulation | ATT&CK T1565  Scenario 9 - Data Exfiltration: Spikes in User Queries Volume If an attacker manages to infiltrate a Snowflake account, they may attempt to extract data from the databases hosted in the compromised account. To detect this type of activity, you can identify users who exhibit significantly higher data querying rates than their typical usage patterns. The subsequent query lets us pinpoint users who have executed queries resulting in larger data volumes than their average daily activity over the previous week.  Triage tip: The suspicion level increases as the difference between the calculated standard deviation of “total_bytes_written” and the sum of “stddev_daily_bytes” and “avg_daily_bytes” grows larger. Relevant Snowflake View SNOWFLAKE.ACCOUNT_USAGE.QUERY_HISTORY Query -- Spikes in user queries WITH user_daily_bytes AS (   SELECT     USER_NAME AS user_name,     DATE_TRUNC('DAY', END_TIME) AS query_date,     SUM(BYTES_WRITTEN_TO_RESULT) AS total_bytes_written   FROM ACCOUNT_USAGE.QUERY_HISTORY   WHERE END_TIME >= CURRENT_TIMESTAMP() - INTERVAL '7 DAY'   GROUP BY user_name, query_date ), user_daily_average AS (   SELECT     user_name,     AVG(total_bytes_written) AS avg_bytes_written,     STDDEV_SAMP(total_bytes_written) AS stddev_bytes_written   FROM user_daily_bytes   GROUP BY user_name ) SELECT   u.user_name,   ROUND(u.total_bytes_written, 2) AS today_bytes_written,   ROUND(a.avg_bytes_written, 2) AS avg_daily_bytes,   ROUND(a.stddev_bytes_written, 2) AS stddev_daily_bytes FROM user_daily_bytes u JOIN user_daily_average a    ON u.user_name = a.user_name WHERE query_date = CURRENT_DATE()   AND u.total_bytes_written > a.avg_bytes_written   AND u.total_bytes_written > stddev_daily_bytes + avg_daily_bytes ORDER BY u.user_name; MITRE Technique Exfiltration | ATT&CK TA0010 Scenario 10 - Anomaly in Client Application For User If a user’s credentials are compromised or there is an insider threat, the attacker may attempt to use enumeration tools or client apps to perform massive data exfiltration. It’s likely that these tools haven't been used by the legitimate user in the past. For this case, detecting any new client app used by the user could be a red flag that is worth investigating. Relevant Snowflake View SNOWFLAKE.ACCOUNT_USAGE.SESSIONS SNOWFLAKE.ACCOUNT_USAGE.LOGIN_HISTORY Query -- User uses a new client application WITH user_previous_applications AS (   SELECT     USER_NAME AS user_name,     ARRAY_AGG(DISTINCT CLIENT_APPLICATION_ID) AS previous_applications   FROM ACCOUNT_USAGE.SESSIONS   WHERE DATE_TRUNC('DAY', CREATED_ON) < CURRENT_DATE()   GROUP BY user_name ), latest_login_ips  AS (   SELECT     USER_NAME,     EVENT_ID,     CLIENT_IP   FROM ACCOUNT_USAGE.LOGIN_HISTORY )  SELECT   s.USER_NAME AS user_name,   ARRAY_AGG(DISTINCT s.SESSION_ID),   ARRAY_AGG(DISTINCT s.CLIENT_APPLICATION_ID) AS new_application_id,   lh.CLIENT_IP as ip_address FROM ACCOUNT_USAGE.SESSIONS s JOIN user_previous_applications u   ON s.USER_NAME = u.user_name JOIN latest_login_ips lli   ON s.USER_NAME = lli.USER_NAME JOIN ACCOUNT_USAGE.LOGIN_HISTORY lh   ON s.LOGIN_EVENT_ID = lli.EVENT_ID WHERE DATE_TRUNC('DAY', s.CREATED_ON) = CURRENT_DATE()   AND NOT ARRAY_CONTAINS(s.CLIENT_APPLICATION_ID::variant, u.previous_applications) group by s.USER_NAME,lh.CLIENT_IP; MITRE Technique Credential Access |  ATT&CK TA0006 4 Additional Queries to Identify Snowflake Threats On top of the scenarios mentioned above, there are more relevant queries you can use to hunt for threats in a Snowflake environment. However, the results of these queries are harder to rely on since they require a deeper context of the regular activities in the organization to differentiate the legitimate operations from those that may be part of a threat. For example, imagine that MFA has been disabled for an administrator. This activity could be either part of a malicious operation or just an operational benign activity. To answer this question, you would need additional context: Who disabled the MFA device? Is it part of any task associated with an active project or duty? And If not,was it really the user, or is it a persistent action caused by an attacker? Query 1 - New Administrative Role Assignment  In the post-exploitation phase of a Snowflake attack, the attacker might create a new administrative user as a persistence mechanism. Relevant Snowflake View SNOWFLAKE.ACCOUNT_USAGE.GRANTS_TO_USERS Query -- Search for new admin role assignments select * from SNOWFLAKE.ACCOUNT_USAGE.GRANTS_TO_USERS where ROLE in ('ORGADMIN', 'ACCOUNTADMIN')  and CREATED_ON>= DATEADD(HOUR, -24, CURRENT_TIMESTAMP()); MITRE Technique https://attack.mitre.org/techniques/T1136/ Query 2 - New Permissions Assigned to a Role In the post-exploitation phase of a Snowflake attack, an attacker may add permissions to a non-privileged role in an effort to achieve persistence using a low-privileged user. Relevant Snowflake View SNOWFLAKE.ACCOUNT_USAGE.GRANTS_TO_ROLES Query -- Search for new admin role assignments select * from SNOWFLAKE.ACCOUNT_USAGE.GRANTS_TO_ROLES where ROLE NOT in ('ORGADMIN', 'ACCOUNTADMIN')  and CREATED_ON>= DATEADD(HOUR, -24, CURRENT_TIMESTAMP()); MITRE Technique https://attack.mitre.org/techniques/T1136/ https://attack.mitre.org/tactics/TA0004/ Query 3 - Changes to Users Security Settings An attacker might change user security settings like passwords, MFA settings, or other authentication methods to ensure persistence, or as a post-exploitation step.  Relevant Snowflake View SNOWFLAKE.ACCOUNT_USAGE.QUERY_HISTORY Query -- Search for user security settings changes select * from SNOWFLAKE.ACCOUNT_USAGE.QUERY_HISTORY where QUERY_TEXT ilike '%ALTER%USER%'        and QUERY_TYPE = 'ALTER_USER'        and REGEXP_LIKE(QUERY_TEXT, '.*(PASSWORD|ROLE|DISABLED|EXPIRY|UNLOCK|MFA|RSA|POLICY).*', 'i')       and START_TIME>= DATEADD(HOUR, -24, CURRENT_TIMESTAMP()); MITRE Technique https://attack.mitre.org/techniques/T1098/ Query 4 - Changes to Network Policies An attacker might alter network policies to allow traffic from a specific IP address.    Relevant Snowflake View SNOWFLAKE.ACCOUNT_USAGE.QUERY_HISTORY Query -- Search for network policies settings changes select * from SNOWFLAKE.ACCOUNT_USAGE.QUERY_HISTORY where (QUERY_TYPE in ('CREATE_NETWORK_POLICY', 'ALTER_NETWORK_POLICY', 'DROP_NETWORK_POLICY') or        QUERY_TEXT ilike any ('% set network_policy%', '% unset network_policy%') )       and START_TIME>= DATEADD(HOUR, -24, CURRENT_TIMESTAMP()); MITRE Technique https://attack.mitre.org/techniques/T1562/004/ Choose a Reliable, Fast, and Simple Snowflake Threat-Hunting Tool In our pursuit to empower organizations with proactive cybersecurity measures, Rezonate is excited to introduce our open-source tool designed specifically for threat-hunting in Snowflake. This tool leverages Snowflake SDK to run the different threat models mentioned in this post and allows you to easily start your own hunting journey in your own environment. Feel free to suggest expansions and improvements – we’d love to hear from you 🙂 You can find a link to our repository here.
Read More
GitHub Account Takeover of AWS and GCP Accounts

From GitHub to Account Takeover: Misconfigured Actions Place GCP & AWS Accounts at Risk

In April 2023, Rezonate research team explored prevalent misconfigurations of GitHub integration with cloud native vendors. GitHub OIDC-based trust relations have been found with the critical misconfigurations that leave connected AWS/GCP accounts vulnerable to potential takeover attacks. Although this issue was discovered and reported in the past, we have found that dozens of GitHub Public Repositories, and potentially many private ones, have demonstrated this critical issue, leaving dozens of companies vulnerable. The team notified recognizable affected organizations, but there may be more private repositories and organizations at risk. In this article, we will introduce the misconfiguration research process,  explain the OIDC implementation process that GitHub uses to authenticate to the cloud, present the misconfigurations that we have identified across various organizations, provide a step-by-step guide for discovering and fixing the problem, and propose how to avoid the issue completely. Key Points Rezonate research team has explored an attack vector that exposed AWS & GCP accounts to unauthorized access through misconfigured OpenID (OIDC) GitHub Actions role. Based on our scans, these known misconfigurations exist in dozens of the GitHub public repositories that use Github OIDC provider to AWS or GCP. During the last few weeks, the Rezonate team has reached out to a few dozens of vulnerable organizations and personal accounts, providing them with information in order to remediate this misconfiguration. To check whether your GCP or AWS accounts have been affected by this misconfiguration, please refer to the “Remediation Guidelines” section. Background Cloud and SaaS technologies have made identity and access controls the connective tissue between operational tools and cloud-native environments. To ensure business operations flow as seamlessly and as fast as possible, IAM and Devops teams are required to share administrative access and create trust relations between 3rd-party tools and their core cloud environments. The key challenge is to limit privileges and conditions on these cases, and to protect and monitor this highly-privileged administrative access. One of the most common examples of trust relations can be found in a software CI/CD pipeline, where strong privileges and access to an organization’s Cloud infrastructure are provided. We’ve seen dozens of cases where this access path was exploited due to misconfigurations, lost credentials and access keys, and compromised supply chains such as the CircleCI incident, the NPM incident, and many others. Figure 1: Attacker scans for misconfigured trust relations in GitHub, and uses them to impersonate a CI/CD app, gaining full access to AWS or GCP accounts. Due to the highly-sensitive nature of these access paths, CI/CD vendors have added support for the OpenID Connect (OIDC) protocol to supply short-term credentials, which are considered more secure. The trend toward OIDC support is reflected through the announcements of GitHub, GitLab, and CircleCI within the last 2 years. OIDC is a modern, secure authentication method for creating trust relationships, but when not configured correctly, the method can become the root cause of a hidden, critical access risk. Even though these misconfigurations were reported in the past, in books, as well as in security blogs, the Rezonate research team has identified many organizations that remain vulnerable.  GitHub OpenID Provider Integration The GitHub OIDC deployment guide highlights many advantages to using OIDC over access keys. OIDC allows you to adopt good security practices, such as: No cloud secrets: Eliminating the need to store cloud credentials as long-lived secrets. Instead, workflows will request and use a short-lived access token from the cloud provider through OIDC. Authentication and Authorization management: Having granular control over how workflows can use credentials, using the cloud provider's authentication and authorization tools to control access to cloud resources. Rotating credentials: With OIDC, the cloud provider issues a short-lived access token that is only valid for a single job, and then automatically expires. The following diagram provides an overview of how GitHub's OIDC provider integrates with GitHub Actions and the cloud provider: Figure 2: Overview of GitHub OIDC provider integration In general, integration involves the following steps: Start by creating an Identity Provider in the target cloud environment. GitHub Actions will generate an OIDC temporary token containing execution context (such as the repository, organization, or branch). GitHub will send a request to the cloud provider, containing the GitHub OIDC token. The cloud provider will validate the token and the context, and exchange it with short-lived credentials that allow access to the cloud environment. GitHub OIDC Integration with GCP & AWS Integrating GitHub Actions through OIDC includes setting up trust between the cloud infrastructure and GitHub, which workflows can then use to access roles and service accounts. Configure Trust The process of configuring trust between the cloud provider and GitHub is similar between different cloud providers, and includes two main steps: Create an OIDC Identity Provider that points to: https://token.actions.githubusercontent.com. Create a Role or Service account and establish trust with the recently created Identity Provider. Let's examine the setup for GCP and AWS. Configure Trust with GCP Based on Google Cloud documentation, the following process creates a Workload Identity Federation, which provides the issuer ID and basic attribute mapping. Figure 3: Creating a Workload Identity Federation Optionally, after configuring the attribute mapping according to the Google Cloud documentation, add Attribute Conditions such as a GitHub organization, repository, or branch. Figure 5: Adding Attribute Conditions Now that we have the Identity Provider configured, we can bind it to service accounts and allow GitHub to use them as part of its workflow. In the picture below we can see the github-actions-integration service account connected to the Identity Provider recently created.  Figure 5: Bind service accounts to Identity Provider Configure Trust with AWS Similar to GCP, AWS starts with creating a new Identity Provider (OpenID Connect) with the GitHub Provider URL. Figure 6: Create an Identity Provider in AWS Next, we can create an IAM Role and reference the recently created Identity Provider, allowing users federated by the Identity Provider to assume roles in the account. Figure 7: Create an IAM Role Next, we name the role, add a description, and modify the access conditions of the role. By default the trust policy condition only includes audience filters. Figure 8: Modify access conditions using filters As mentioned in the GitHub integration documentation, it's highly recommended that you limit access to specific repositories by adding filters against the token subject. Note that by default the AWS process does not enforce adding additional conditions. To add conditions, click the “Edit Policy” button, which reveals the following warning: Figure 9: Missing additional conditions warning in AWS Configure GitHub Workflow Now that everything is configured from the cloud infrastructure side, the next step is to use the relevant GitHub actions as part of the workflow. First, add permissions to the workflow, allowing it to read an OIDC token. Add the following permissions to the beginning of the workflow YAML file: Figure 10: Add permissions to GitHub workflow Next, add the matching action to the authentication process, based on the cloud provider:For AWS, use the configure-aws-credentials: Figure 11: Add matching action to authentication process - AWS For GCP, use the google-github-action/auth: Figure 12: Add matching action to authentication process - GCP After performing the steps above, the integration process is completed and the workflow can perform operations in the cloud environment. Potential Misconfiguration Although the integration between the cloud and GitHub is relatively simple, potential misconfigurations could expose access to unauthorized parties. GitHub articles refer to Conditional access as part of the integration process, however, the cloud infrastructure is not flagging or alerting when conditional access is not being used. The lack of notification from the cloud provider during the setup increases the chances that an organization will have misconfigured trust settings. Those misconfigurations may result in roles and service accounts that can be abused by threat actors/attackers, leading to unauthorized access. As a result of our research, we have discovered two specific types of misconfigurations that can be exploited by attackers to gain unauthorized access to a trusted cloud account. Misconfiguration - Lack of Subject Condition This misconfiguration occurs when the user who integrated the role did not add conditional limitations to cloud access. This misconfiguration allows any GitHub organization to access the cloud account. Misconfiguration - Poorly-Defined Condition Pattern This misconfiguration occurs when the conditions defined limit the subject, but are not restrictive enough and thus can be bypassed. For example, the subject condition may include a wildcard to allow all the repositories in the organization to use the same role or service account as part of the GitHub Actions workflow. If the wildcard is mistakenly placed in the organization name (and not in the repository name), the condition allows unauthorized access from any GitHub organization with a name that fits into the pattern. Identifying Vulnerable Organizations To Identify vulnerable organizations and understand how prevalent misconfigurations are, we used GitHub search, looking for Actions workflows that use OIDC with AWS or GCP. Using GitHub Code Search, we executed the following queries: Figure 13: GitHub Code Query - AWS OIDC Workflows Figure 14: GitHub Code Query - GCP OIDC Workflows We split the query into subqueries to avoid reaching GitHub’s result limit, and eventually produced a list of roles and accounts that were potentially vulnerable. Having the list, the next step was to identify what was misconfigured. GitHub actions query returned thousands of results, and checking them through GitHub actions would be time-consuming. As a workaround, the team developed a different approach to identify vulnerable organizations using self-hosted runners. Self-Hosted Runners Github Self-Hosted Runners is a feature that allows organizations to execute parts of the GitHub Actions workflows in their own environment. The team discovered that by controlling the machine that authenticates against the cloud, we can extract the OIDC token, and perform batch tests on AWS roles and GCP service accounts outside of GitHub. The batch tests included the following steps: Setup a self-hosted runner:Download and install the GitHub self-hosted runner: Figure 15: Our self-hosted runner Configure the runner to proxy all of the traffic through our local proxy:Use the http-proxy parameter within the GitHub action. Figure 16: The GitHub workflow configured to trigger token generation. Intercept a workflow request and extract the Web Identity Token:After everything was ready, we triggered the workflow by performing a commit to the repository. The commit started a GitHub workflow which performed a network request to assume the target role with the Web Identity token. Then, we extracted the token from the request sent by the runner to AWS. Figure 17: Extract token from runner request - AWS Decoding the JWT Token reveals our sub, along with other identifiers that are being sent and logged by the cloud provider as part of the authentication process. Figure 18: Decoding JWT token Copy the token to our multithreaded script, which will check the potentially vulnerable roles. Using a pre-developed script and leveraging Boto3 and Gcloud, we scanned a list of potentially vulnerable roles while having the JWT at hand. Results After reducing duplicate roles and service accounts, we scanned approximately 1500 roles and service accounts across GCP and AWS. As for the first misconfiguration, lack of subject condition, we determined that dozens of the roles were vulnerable, allowing anyone to use them to access the accounts. The second misconfiguration, poorly-defined condition, was harder to test and required setting up a dedicated GitHub organization per target. Thus, we performed a random test against 20 organizations, finding one of them to be vulnerable to this attack. The vulnerable accounts included various organizations, including private companies, non-profit organizations, software development studios, and many personal accounts. During the last few weeks we have reached out to the relevant organizations and people, sending them information regarding the vulnerable roles and sharing remediation guidance. Remediation Guidelines Could My Environment Be Affected?  Based on our research, this type of misconfiguration is a risk for AWS and GCP users who use GitHub Actions with modern authentication (OIDC). Identify Potential Misconfigurations: Lack of Subject Conditions To identify this misconfiguration In AWS, check for roles that have no subject limitations in its trust policy. Figure 19: Misconfigured Role with no Subject - Example - AWS To identify this misconfiguration in GCP, check for service accounts connected to the Identity Provider that has access to the Entire Pool. Figure 20: Misconfigured Role with no Subject - Example - GCP Identify Potential Misconfigurations: Poorly-Defined Conditions To identify this misconfiguration in AWS, locate the StringLike conditions for roles that are connected to the Identity Provider, and check for wildcards in the organization name. Figure 21: Misconfigured Role with Poorly-Defined Condition Pattern - AWS For example, in this case, we have a role that was originally intended to be used by different repositories within the Rezonate organization. Since the StringLike conditions included a wildcard in the organization name,  every organization that starts with “rezonate” can assume this role. This means that an attacker can create a new GitHub organization with the name “rezonateX” and get access to the role. This misconfiguration option does not apply to GCP, as GCP does not support wildcards. Identity Risks in the Rezonate UI Rezonate customers should look for the security risk “GitHub Actions Role vulnerable to hijacking” in the Rezonate UI and follow the guided remediation steps attached to it. Use a Script to Perform a Quick Scan For the general public, we have released a script to our GitHub repository (link here), which performs a quick scan against the AWS account or GCP project and reveals possible vulnerable roles and service accounts.
Read More
Rezonate Compliance SOC2

How Rezonate Maintains Audit-Ready State Using Rezonate

We all understand the importance of maintaining strong security protocols and controls. That’s why Rezonate decided to invest in the SOC 2 Type 2 compliance early on, and after only one month since our out of stealth announcement, we successfully achieved attestation. What exactly is SOC 2 Type 2 certification, and why is it important to you? SOC 2, or System and Organization Controls (SOC) 2 type 2 is a widely recognized set of standards that ensure a company’s controls have been independently examined and tested.  The “Type 2” designation refers to the fact that the audit covers a period of time, meaning that a company has not only implemented proper controls, but also demonstrated their continuous effective operation over a period of time.  Which is the key point I want to highlight here: a point-in-time validation vs. continuous readiness. Rezonate protects Rezonate Following any compliance requirements can be quite challenging. For starters, you need to fully understand the specific framework by analyzing and interpreting the right categories and controls. Then, using different assessment tools and manual efforts, you compile a list of all requirements, identifying what has been completed and what needs to be done, ensuring that the process is properly documented, logged, and monitored. So, how can you take steps to remove manual time-consuming actions, excel at all delicate tasks, ensure an error-prone process and achieve zero exception compliance? At Rezonate, we, the Security & DevOps team, use the Rezonate Cloud Identity Protection Platform (CIPP) on a daily basis for several use cases. As part of our ongoing protection of - our own human and compute resources’ IdP-IaaS identities and every access attempt to and from our cloud-native stack -  we ensure continuous compliance readiness across key identity-first trust principles defined by the SOC 2 audit: Security - Enforce the protection of data and systems, against unauthorized access, enforce MFA, and strengthen access controls. Strict inbound and outbound rules. Availability - Maintain availability SLAs at all times. Building inherently fault-tolerant systems which do not crumble under high load. Invest in network monitoring systems and DR plans in place. Confidentiality - Restrict and monitor access to organization’s confidential data and adhere to the principle of least privilege. We do that with the goal of continuously improving our controls and processes, ensuring that we are always meeting the highest standards in the industry. In a real-world and active environment, drifts may happen, however the process we’ve built around it course-correct itself. Protect identities, access, systems, and data We operate in a faced paced environment and therefore our infrastructure changes fast. Yet, we still allow our team the flexibility required to build fast - without compromising security. Using the Rezonate platform, our customers understand the identity security posture with complete visibility of their identities, policies, and access requests to meet all IAM aspects required for the security, availability, and confidentiality principles. Centralized identity inventory - Up to date inventory of all identities: employees, 3rd party vendors, machine resources, roles, groups, applications, and all required context across your multi-IdP / multi-cloud infrastructure. Access events - Discover and understand every access performed on or from a monitored identity, since its creation time to its last active session and activity performed. Privileges analysis - Evaluate entitlements provided to actual usage and true need for access and business operation. Behavior baseline & drift - Analyze every access request to critical data and application and realize possible risk across our IdPs and cloud infra. Risky exposures - Detect and better understand critical exposures, new access requests, and policy distribution to our engineering and overall staff. While we evaluate each request and relevant context to uncover potential hidden interdependencies, risk and implications. Threat detection - Detect any malicious impersonating, access rights, and excessive privileges, while evaluating possible impact, and taking action before damage occurred. Remediate - Proactively enforce a real-world least privileged access where Rezonate’s DevOps can ‘flex’ policy for unnecessary and risky privileges and ‘relax’ entitlements and access privileges for confirmed benign ones for increased productivity and agility. We have built this mechanism, all while abiding compliance mandates, to comply and stay audit-ready despite complex architectures to protect our most trusted asset - our customers’ data. Be able to provide required proof for observation period instantaneously without the manual effort involved.  If you want to speak with our team on how we are leveraging the Rezonate platform to protect Rezonate and by doing that, maintain SOC 2 Type 2 audit readiness for everything related to your identity and access, sign up for a demo or simply let us know [email protected].  Thank you to our partners, EY and Scytale, for their partnership on this and future milestones. 
Read More
See Rezonate in Action

Eliminate Attacker’s Opportunity To Breach Your Cloud today

Organizations worldwide use Rezonate to protect their most precious assets. Contact us now, and join them.